Invoicing is an important part of doing business.
It's more than just requesting payments: professional, accurate invoicing is crucial for business administration, proper accounting and brand image. It also helps you retain clients — confusing or inaccurate invoices may lower their interest in doing business with you!
If you are new to invoicing, you are in the right place. This guide walks you through the process of creating an effective invoice, step by step.
Understanding the Basics of an Invoice
First, let's go over the basics of an invoice.
An invoice is a document sent to a customer, requesting payment for goods or services you've provided to them.
Apart from ensuring you get paid, it also serves as a formal record of the transaction for taxation and accounting purposes.
An invoice has several key elements that you should know about:
- Date of issuance
- Unique invoice number
- Your business' contact information
- Client's contact information
- A detailed list of services or products provided
- Discounts, taxes, and additional charges
- Total amount due
- Payment instructions and terms
- Notes
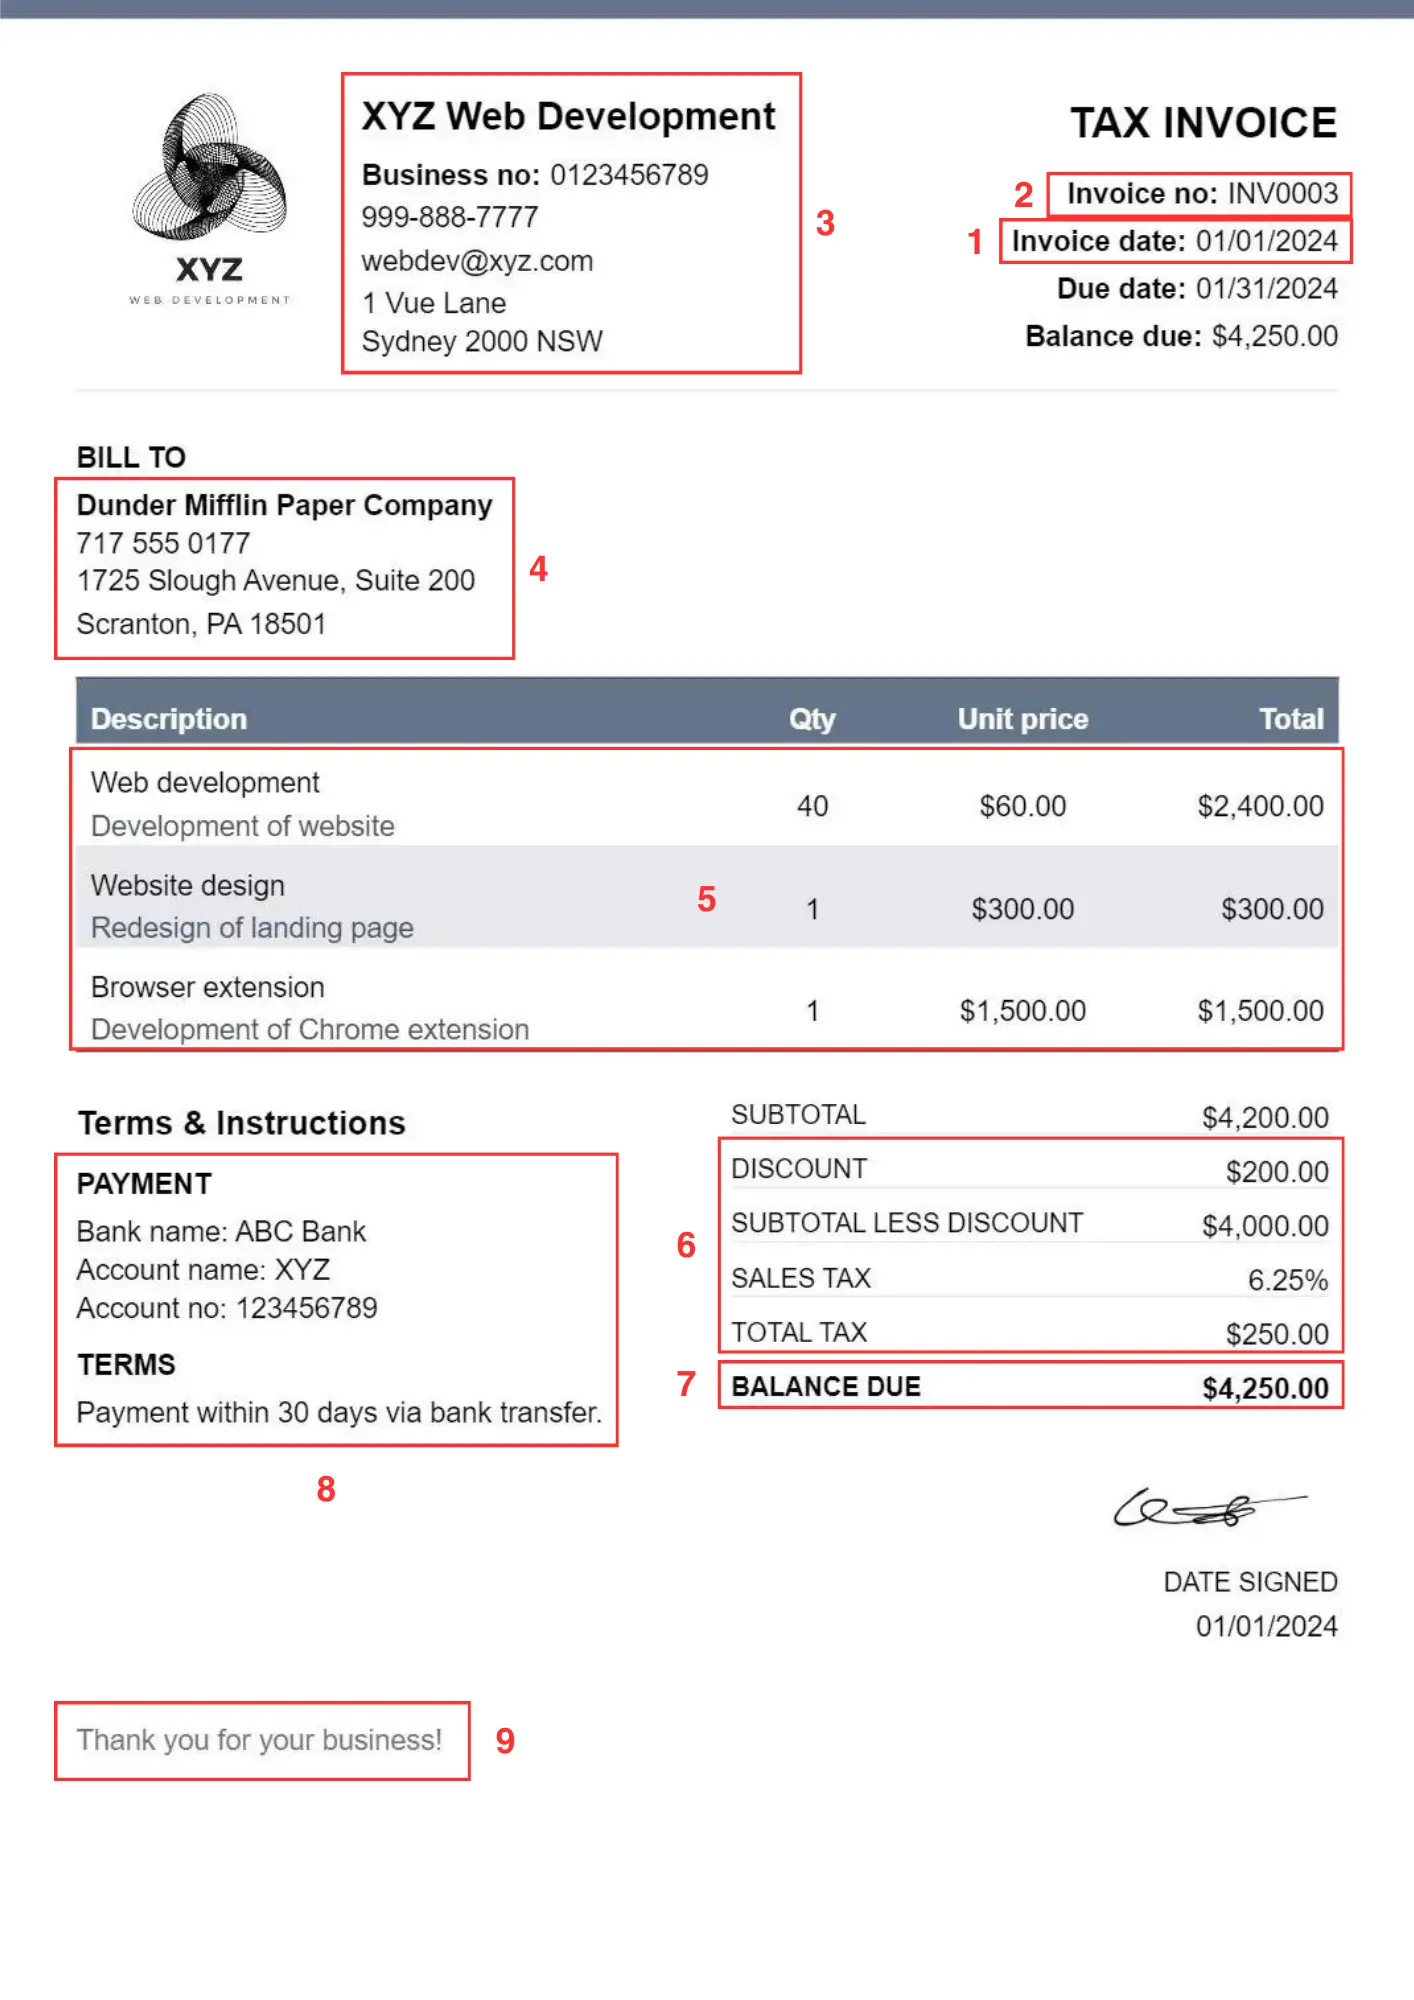
1. Date of issuance
This is the date when the invoice is created and sent. It's important for tracking the invoice and determining the payment due date.
2. Unique invoice number
Each invoice should have a unique number for identification. This simplifies record-keeping for both you and your client.
3. Your business' contact information
May include your business' name, business number, address, phone number, email address, and any other contact details.
This ensures the client knows who the invoice is from and how to contact you should they have questions.
4. Client's contact information
Just like your details, include your client's name, address, and other contact information.
This clarifies who the invoice is addressed to.
5. A detailed list of services or products provided
List each product or service you are charging for with a clear description, price and quantity.
This helps avoid disputes and makes it easier for clients to verify what they are being charged for.
6. Discounts, taxes, and additional charges
If the invoice includes any discounts, taxes or other amounts that affect the total amount, they must also be listed.
7. Total amount due
Sum up the costs of all items, discounts, taxes and other charges to provide a total amount that the client needs to pay.
This should be clearly displayed on the invoice.
8. Payment instructions and terms
This section should detail how and when you expect to be paid.
Include accepted payment methods, like bank transfer, credit card, PayPal, and so on. You can also include other info such as the due date, early payment discounts or late fees (if any).
9. Notes
An area for any additional communication with your client, such as thank-you notes, reminders, or specific instructions related to the invoice or services.
Manual Invoicing vs Invoicing Software
When you begin invoicing, one decision you need to make is how you do it.
You can create invoices manually by choosing a template and using a word processor to fill in your data. However, this has downsides: it's more time-consuming and challenging to create and track them.
Invoicing software offers many benefits: better customization options, automatic calculations, and the ability to create, track and manage invoices more efficiently. But, it typically comes with some cost.
Choose a solution that fits your business needs and budget.
Preparing to Create Your Invoice
Before you dive into creating an invoice, gather all the required information.
As mentioned above, this includes your client's contact details, the details of the products or services you provided, the agreed-upon prices, and so on. Keeping this information organized helps you create your invoice more efficiently and accurately.
Creating an Invoice
You've chosen your preferred way of invoicing and have all the needed information at hand. So, what's next?
- Select a Template
- Fill in Business and Client Information
- Describe the Services or Products
- Calculate Totals
- Specify Payment Instuctions and Terms
- Add Additional Notes
- Review for Accuracy
1. Select a Template
First, select a template. There are a lot of different ones to choose from, but the main thing is you feel it suits your brand.
You might also customize it by adding your logo and brand colors.
2. Fill in Business and Client Information
Next, fill in your business' and client's details. If you had all the information ready, this should be straightforward.
3. Describe the Services or Products
Add all the products or services you've provided.
Having clear descriptions, prices and quantities for each item is essential. At least include the name of the item, and if necessary, a brief description of it. If you are billing for a service charged at an hourly rate, it can help to specify that with an "Hours" unit, or if it's a product sold in quantities, you might include a "Quantity" (or "Qty") unit.
4. Calculate Totals
Calculate the subtotal for all the items. Deduct discounts, add taxes and other charges (if any), and finally calculate the balance due.
Make sure each line and calculation is clearly visible on the invoice.
If you are using invoicing software, this is done automatically.
5. Specify Payment Instuctions and Terms
Next, add your payment instuctions and terms. Include acceptable payment methods and how your client can pay you (e.g. your bank account details).
As mentioned above, also mention any payment terms you have, such late fees and due date.
5. Add Additional Notes
Last thing to fill out is additional notes.
Use this space for any additional information you want your client to see, like a thank-you message or specific instructions related to the invoice.
5. Review for Accuracy
Finally, make sure all the information you've just entered is accurate.
This step is crucial to avoid any issues — your client not being able to contact you or, worse, being overcharged!
Best Practices for Invoice Management
After sending an invoice, track its status. To stay organized, mark paid invoices as "Paid". Follow up on overdue invoices and maintain records for accounting purposes.
It's also important to understand legal requirements related to invoicing in your region — for example, how long you are required to keep the records.
Common Mistakes to Avoid
Lastly, here are a few common invoicing mistakes for you to avoid:
- Lack of Professionalism: Sending out invoices that are poorly formatted, difficult to read, or unbranded can negatively impact your business' image. So, invest time in creating a professional and clean invoice template that reflects your brand.
- Inaccurate Details: Errors in the client's contact information, the date, the total amount due, and other info will likely lead to delayed payments and appear unprofessional. Double-checking all the details is really good practice!
- Not Numbering Invoices: Every invoice should have a unique number for easy tracking and reference. This is vital for your accounting records and for resolving any discrepancies with clients.
- Late Invoicing: Delaying sending out invoices can cause cash flow problems to your business.
- Vague Descriptions: Invoices should clearly describe each item or service billed. Vague descriptions can lead to confusion and disputes, potentially delaying payment.
Conclusion
Sending out professional and accurate invoices is essential for running a successful business.
It not only helps you get paid on time, but also does a lot for your business administration, accounting and brand image — as well as maintaining positive relationships with your clients!
By following these steps and the best practices, you can streamline your invoicing process in a way that helps your business succeed.
Also Read
Happy invoicing!